
Like most people I started off with the dining room table, moved on to taking up some extra space in a cupboard or two and then finally, out of desperation, took over the box room.
I have been crafting out of there for about 5 years, ever so thankful to have my own space of course, but up till now it has just been a mish mash of old furniture and bits and bobs that I threw together.
Then came the re-vamp. We needed to accommodate an extra single bed and I took the opportunity to lean on hubby who graciously made me a table/worktop unit thingy to my very own specifications. Can a girl ask for more than this ... I think not.
I did loose some space, but what I have now is so much more user friendly, and as a bonus, if I do end up crafting until the wee hours of the morning, I can literally just crash in the bed without waking everyone up ... works for me!
There are still some pictures that need to be hung on the walls above the bed ... but like with any good DIY job, some finishing bits have to get left for at least 6 months ... I have yet to figure out why it is always like that.

So, bed is along the shortest wall, worktop on the one side and bookcase and shelves on the other. You might notice the green drawers everywhere, well that used to be my main way of storing everything. Lovely (and above all CHEAP) cardboard drawers from IKEA. Of course they couldn't go into the bin, so I painted them with the same PVA I used for the green wall and they still house all sorts of things. At the moment I have to open at least 3 drawers before I find what I am looking for, they are meant to be labelled ... yet another thing that is not quite complete.
I will either get to know exactly where everything is quite quickly, or I will get so fed up that I eventually make the darn labels ... we will just have to see which comes first.

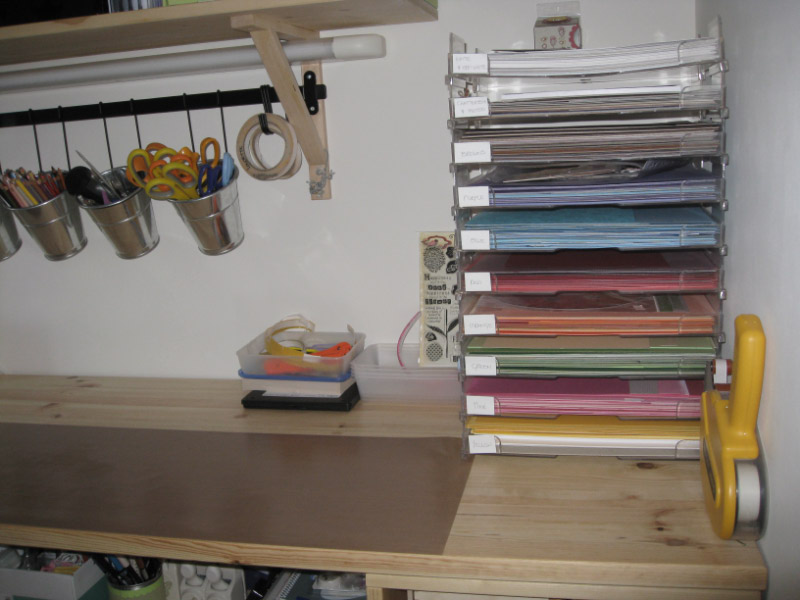
LOVE the worktop! It is standing height, so no more chair to clutter the room with. I have one of those teflon oven sheets covering the top. Yes, Tim Holtz calls it a craft sheet, but mine is just from Lakeland. Also an A3 cutting mat on the one side next to my trimmer and on the other side is my cardstock in 12x12 plastic trays, sorted by colour.
Under the worktop is my other set of 12x12 trays with patterned papers, more drawers (I think I have a thing for drawers) and some extra space behind the drawers for keeping those things I don't need on a daily basis ... like all the envelopes I bought when I thought buying them in bulk was a good idea.

Opposite the worktop is my Billy bookcase, with my pink fastenator that I have used all of two times, more drawers (see I told you) and a whole bunch of thin plastic storage trays (also from Lakeland) that I keep flat things in ... like uhm, stickers, my sheets of flat backed jewels and ... well .... other flat things I can't think of now.
At least some of the drawers in the bookcase have been labelled, I am not totally useless.
At least some of the drawers in the bookcase have been labelled, I am not totally useless.

Oh yes, then of course there is also the clip-it-up with all the embellishments I never use ... intend to use when I buy them ... but somehow never use. What you see above is the cleared out version of my clip-it-up ... there was more, but when it won't spin any more you know it is time for some drastic measures.

Inkpads ... yes, that is pretty self explanatory. Bought a nice inkpad unit, although I had to do some modifying so that it could house my SU pads, but it works well enough.

Ribbons all hang on this trouser hanger from ... you guessed it ... Lakeland. Works really well actually. Little bits of ribbon and spool are in two drawers, but the long bits hang here and look pretty.

Punches in an over the door shoe hanger ... NOT from Lakeland, although my bet is they probably do these as well. Other SU punches are on an IKEA rail under my desk. I first saw this idea in CK magazine and have subsequently seen many people store their punches like this. It works so well.

Oh yes, under the rail is two builders boxes for itty bitty things. I have a lot of itty bitty things.

Next, the very ingenious way I store my ink refil bottles and paint dabbers ... in a box.

New Copics on the shelf below. Because I bought the full sets they came in two plasic boxes which fit perfectly on my shelf, so that is my ... again very ingenious ... way of storing my copics. Then of course the IKEA rail and tin buckets ... who doesn't have those. Also a daylight neon tube under the shelf. Now that is some serious must have stuff - love that daylight tube.

Pretty black Damask desig box for keeping all of my already done cards that I hope to sell again some day. This is from Argos and thankfully not green. Love green, but enough already with all the green drawers.


Magazines on the floor in magazine boxes and these green drawers hold all of my scraps by colour ... again they need labels ... I really need to do those labels.
And that is that. Nothing here that is new or ingenious, but it works.


